Do you already have a WordPress website but still:
- Spending time manually sending invoices and waiting for the payments from your customers?
- Looking for ways to automate a recurring billing process and save time?
If yes, you have landed on the right blog.
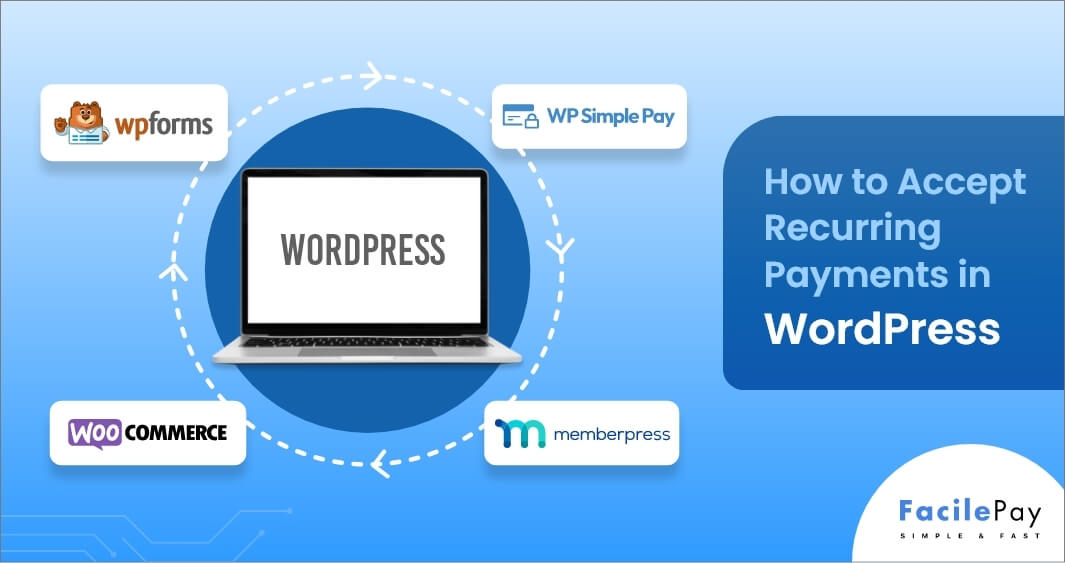
In this article, we will show you how to easily accept recurring payments in WordPress using multiple methods. From this article, you will learn 4 ways to automate recurring payments such as
- Accept Regular Recurring Payments Using WPForms Stripe Addon
- Add Recurring Payments Using MemberPress
- Accept Repeat Payments Using WP Simple Pay adding recurring billing period
- Accept Recurring Yearly Payments Using WooCommerce
Let’s get started with the different methods to create recurring payments.
Contents
- Different Methods to Create Recurring Payments
- Method 1. Accept Recurring Monthly Payments Using WPForms Stripe Addon
- Method 2. Accept Recurring Payments Using MemberPress
- Method 3. Accept Recurring Monthly Payments Using WP Simple Pay
- Method 4. Accept Recurring Payment Using WooCommerce
- When to Use Which Plugin for Recurring Payments in WordPress
- Frequently Asked Questions About Recurring Payments in WordPress
- Which is the Best WordPress Recurring Payment Plugin?
4 Different Methods to Create Recurring Payments
Here is a brief overview of different methods to accept WordPress recurring payments:
| Logo | Plugin Name | Description | Website link |
|---|---|---|---|
 |
WPForms Stripe Addon | WPForms Stripe Addon connects your WordPress website to the Stripe payment gateway. It offers various options to create multiple recurring plans for your products and services. | https://wpforms.com/ |
| MemberPress | With MemberPress you can monetize your WordPress site, build a perfect membership site, and accept credit cards and digital wallets securely. | https://memberpress.com/ | |
| WP Simple Pay | Start accepting one-time and recurring payments on your WordPress site without coding. | https://wpsimplepay.com/ | |
| WooCommerce | WooCommerce is the most advanced plugin in the list. Manage your business on the go with the WooCommerce plugin. | https://woocommerce.com/ |
Now that we’ve scanned through the overview, let’s understand each method in detail to easily accept recurring payments/credit card payments.
Method 1. Accept Recurring Monthly Payments Using WPForms Stripe Addon
Follow this step-by-step guide to accept recurring payments using WPForms Stripe Add-on.
-
Install the Plugin to Start Accepting Recurring Payments
-
Create a Recurring Payment Form to Accept Payments
-
Customize the Fields
-
Connect Your Form to Your Payment Provider
-
Publish a Payment Form to Collect Recurring Payments
Go to the official WPForms website and download the WPForms plugin.
After completing the initial installation process, install all the add-ons you want to use with your WordPress account.
You will find multiple options for setting up the recurring payment form. However, the most useful ones might be locked behind a paywall. Browse through the different payment plans and the features they offer.
For example, the Stripe account add-on is available in the WPForms Pro package. You will also get the same functions and much more with the elite plan. However, it is more expensive than the Pro plan. The Pro plan also offers Paypal Commerce Add-on.
Here is a screenshot that shows how to set up the addon option of the WPforms plugin on WordPress to set up recurring payments.
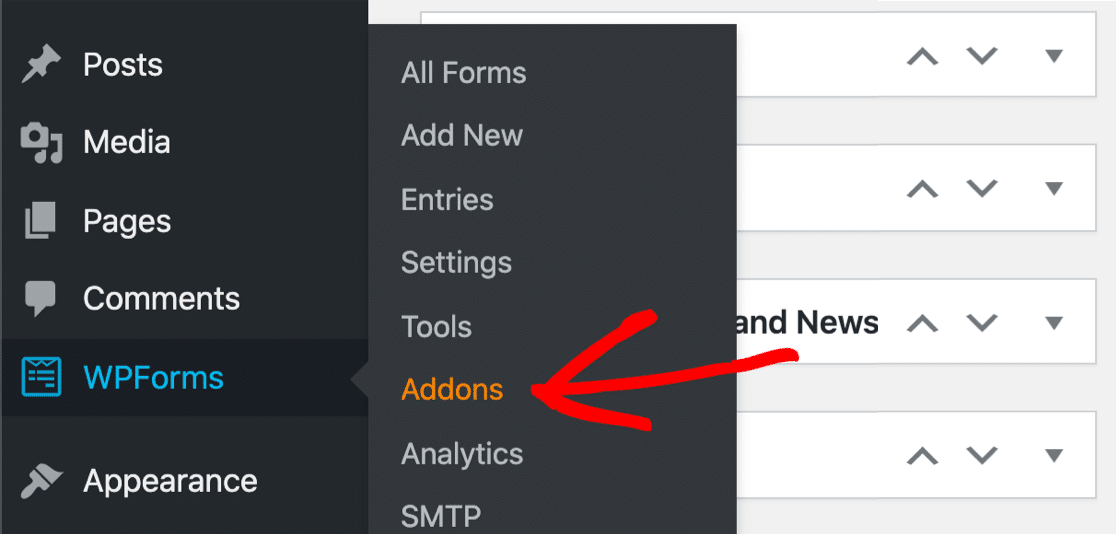
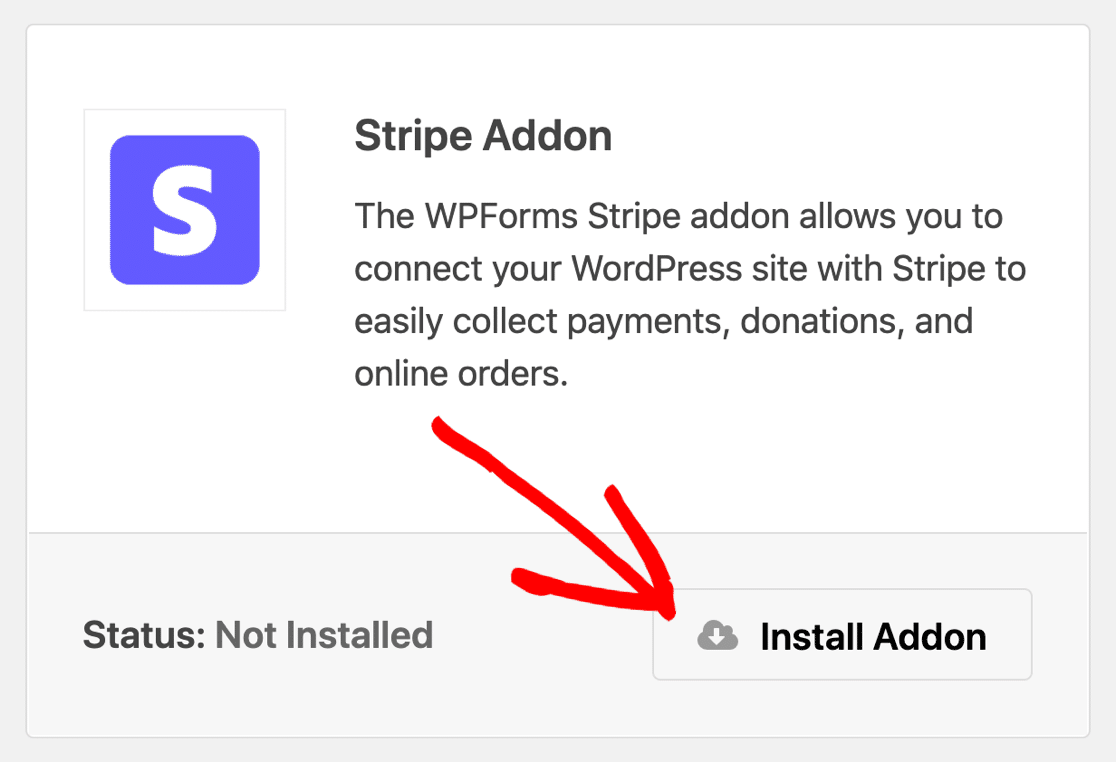
Now, open your plugin page and go to the add-ons drop-down menu. Click on the Stripe add-on and install it. Finally, connect the add-on to the WPForms plugin.
Here is another screenshot that shows you the Install button of Addon for WPforms Stripe integration.
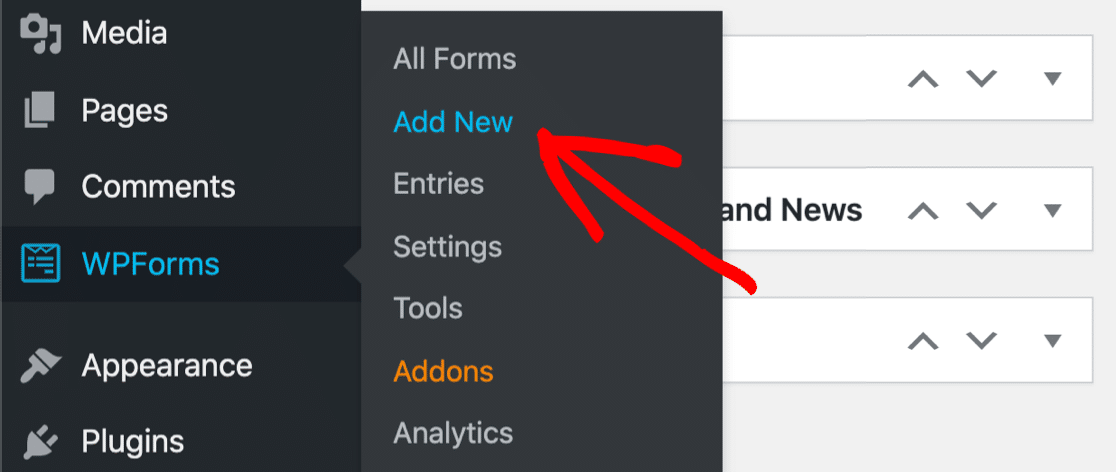
It’s time to create recurring donations form using the Stripe account Add-on. Remember, these steps are the same for creating other forms using this plugin.
Go to WPForms and click Add New to generate a blank payment form. Name the donation recurring form for easier access. WPForms offers over 400 templates to help you design your recurring payment form. Select a donation form template that suits your needs.
Here is a screenshot that shows how to set up a new form to receive recurring payments through Stripe.
Customize the field using the drag-and-drop editor. You are also free to change the name of your fields. Keep tweaking the form until you are satisfied with the template design.
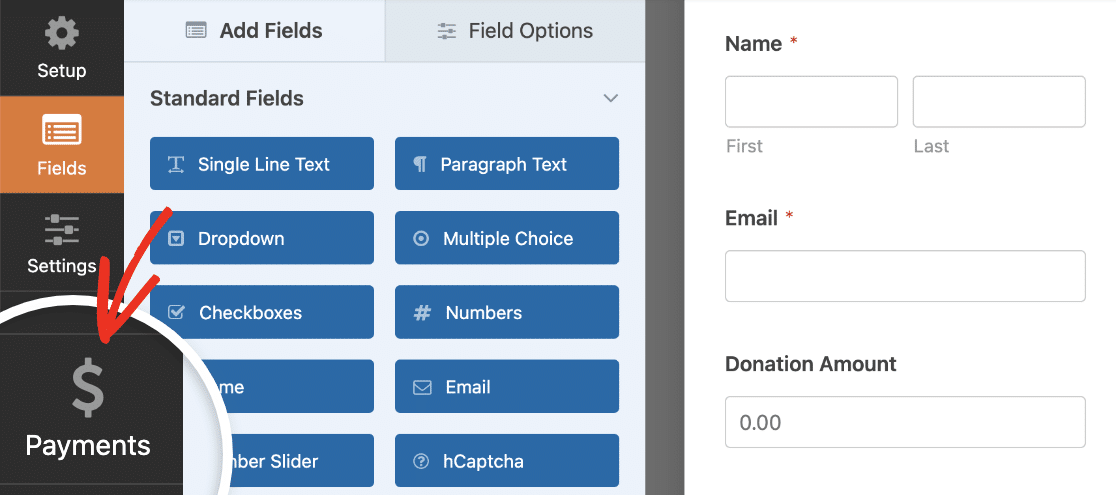
WPForms has a separate section for adding and customizing payment fields. This makes it more convenient if you want to add multiple payment options to your forms.
Here is a screenshot that shows the payments field which you can customize in your form as per your requirements.
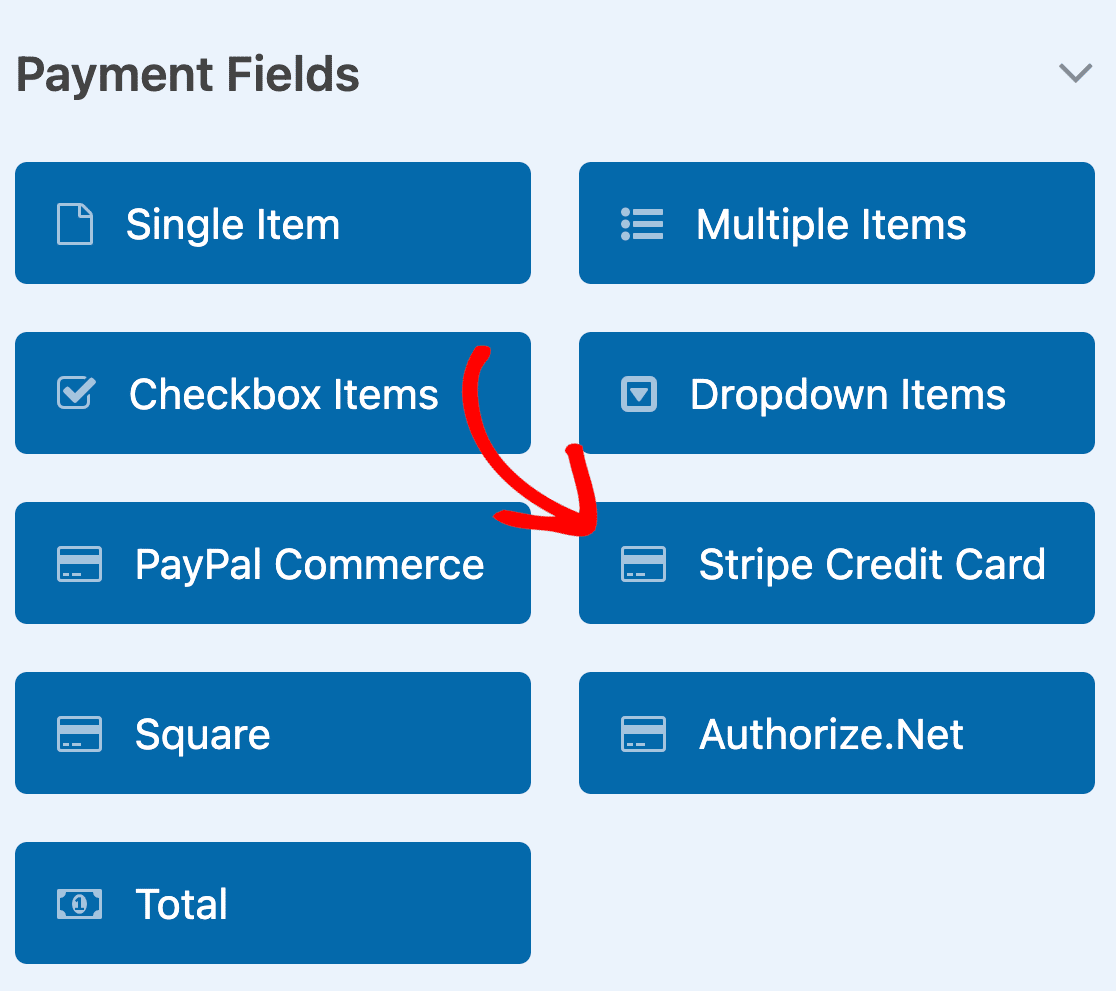
The payment fields drop-down menu offers multiple options to add the payment field. You can either choose single or multiple-field items. The menu also contains options for PayPal Commerce and Stripe Credit Card payment fields. With the Elite WPForm plan, you can also choose the authorize.net option for receiving recurring payments.
All you have to do now is connect your form to the payment provider.
To do this, click on the edit settings to use the fields to create a new subscription account. Click on the Payments option from the form builder menu. Then click on the Stripe payments option and open the Payment settings there.
Here is the screenshot of WordPress where you can find payments setting to set up your payment provider.
A new dialogue box will appear. Enable Stripe payments here to collect recurring credit card payments. Add a payment description to make it easier for your patrons to identify which options to select. Select the email address option to send the payment receipts to your subscribers.
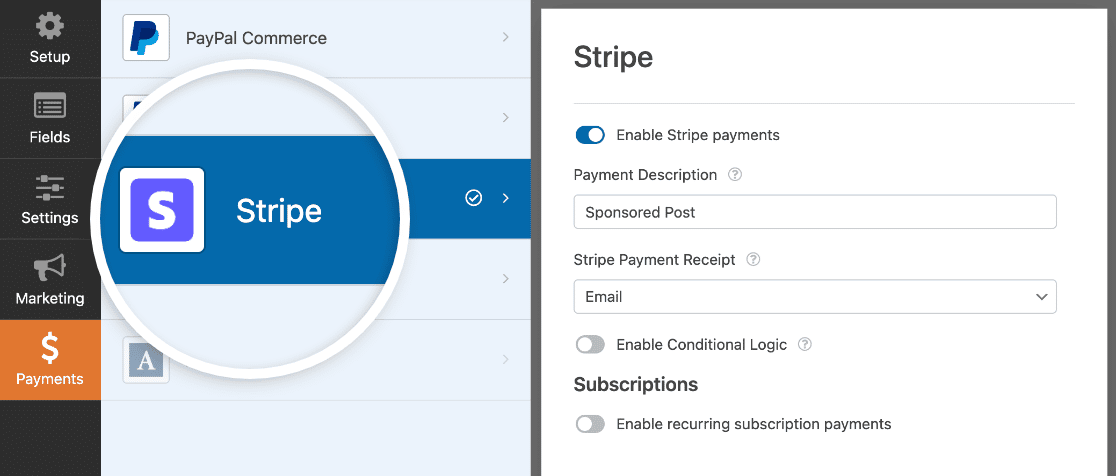
After setting the payment options, toggle on recurring subscription payment options. You need to make small adjustments here. For example, add multiple recurring billing period options to make your payment plans flexible for your supporters. This will enable seamless automatic renewals for your subscription product. Click on Save to confirm the connection to the payment solution provider.
Testing your recurring payment forms is absolutely crucial before you publish them. Check all the fields and recurring subscription payments methods before clicking on the publish button.
Click on the Embed form option to start the publishing process. A new pop-up asks you to select a page to embed the form in. If you already have a page, click on the select existing page. If not, select create the new page.
Here is the screenshot that visually represents where to find the embed code option.

Just follow the instructions to complete the final few steps of publishing. Once you’ve published your form, click on the entries option in the WPForms drop-down menu to see all the payments. You get complete control over the payments from this page. You can even amend and cancel customer plans from the entries page.
That’s all you need to do to accept synchronized payments for your subscription products for every billing interval.
Method 2. Accept Recurring Payments Using MemberPress
MemberPress recurring payment model is more suitable for WordPress website owners who are selling courses and services. Here’s how to accept recurring payments using it:
-
Install the Plugin to Start Accepting Recurring Payments
-
Setting the Payment Gateway for Recurring Billing
-
Connect the Field to Your Payment Processor
-
Create a Membership With a Recurring Payment Option
-
Final touch-ups
Now, there are a couple of ways to download the MemberPress plugin—the automatic or manual method.
In the automatic method, you search for the plugin in the WordPress repository and add it from there. Or you can download the MemberPress zip file from their website by following the installation steps.
Check the following screenshot that where to find the MemberPress option from WordPress dashboard.
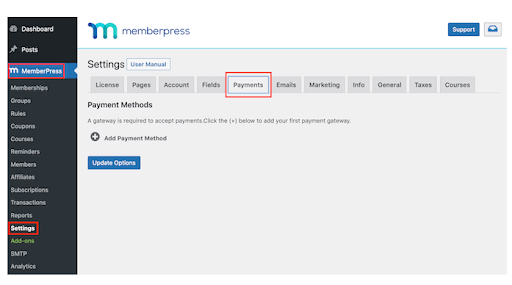
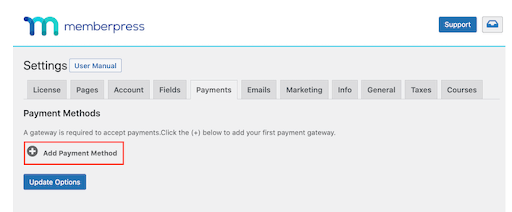
After the installation is complete, go to settings and select Payments. As per their guidelines, you need to list at least one payment method to set up a recurring payment plan.
So, click on Add Payment Method. And select your desired payment gateway from the drop-down menu. Once done, a few checkboxes will appear. Tick them all for a more convenient setting up process.
Here is the screenshot that shows you the option of adding a payment method to receive payments.
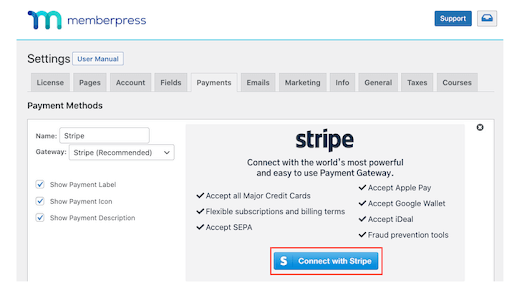
Selecting a payment method will open a new dialogue box. You have authorized the connection of the payment method with the payment processor through this.
When you click the Connect button, it will prompt you to enter your MemberPress login details. It will finish the setup if you already have a seperate merchant account with the popular payment methods. If not, it will guide you through it to create an account with them.
Here is a screenshot that shows you how to connect your MemberPress form with Stripe payment gateway.
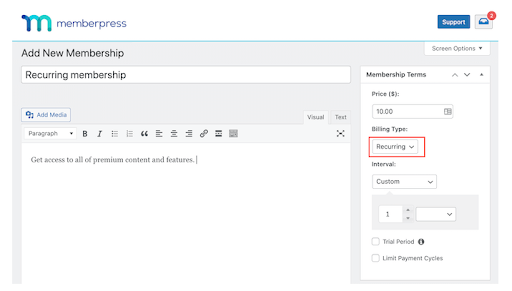
Select the membership option from the dashboard. Click on Add New. This action will redirect you to another page.
Name the membership and set the price. Below the price option, you will find the billing type. Click on it and select recurring. Now, select the intervals at which you want to charge the customer. You can also include free trials or limit the payment cycles according to your needs.
Check the following screenshot to know how to add details when creating a new recurring membership.
If you select the trial option, it will open another drop-down menu. Select the duration for the trial period before clicking on the OK button. Each customer can access one free trial. They cannot resubscribe to avail of this offer. Of course, MemberPress offers you the option of removing this restriction.
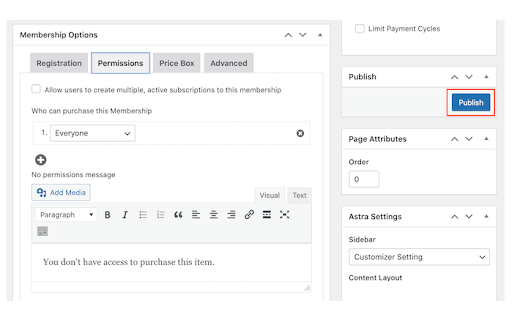
Choose how your registration button appears to your customers. Furthermore, add pictures, payment descriptions, and content layouts, and change the page attributes. After you are satisfied with the appearance, click on Publish.
You can check and test your links from your dashboard.
If you want to offer multiple subscription options to your customers, follow the steps mentioned above to create a new membership program.
Check the following screenshot to set up the permission and publish your new membership program.
Method 3. Accept Recurring Monthly Payments Using WP Simple Pay
Like MemberPress and WPForms, you can also use WP Simple Pay to accept payments from your subscribers on your WordPress Page. But first, you have to download and install the WP Simple Pay Plugin. Let’s see how to activate WP Simple Pay and accept recurring payments.
-
Create the Form for Recurring Billing
-
Set-up Different Options for Subscription Payments
-
Set the Payment Fields
-
Embed the Forms Into Your Page
-
Additional Setting Configuration
-
Add or Remove Discount Coupons.
Use your WP admin account to login into WP Simple Pay. Now, create a new form by clicking on the Add New option. With WP Simple Pay, you can create multiple payment forms with unique settings and payment options.
On the first form creation page, choose the form type. Choosing the embedded form type will open the payment options on a new page. And the pop-up type will open it in a pop-up window.
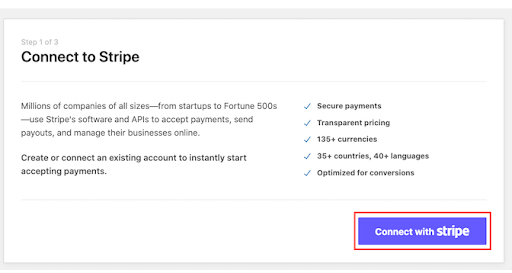
You can also choose the Stripe account checkout option that opens the payment gateway.
Here is the screenshot that shows you the first step of connecting Stripe with your WP Simple Pay.
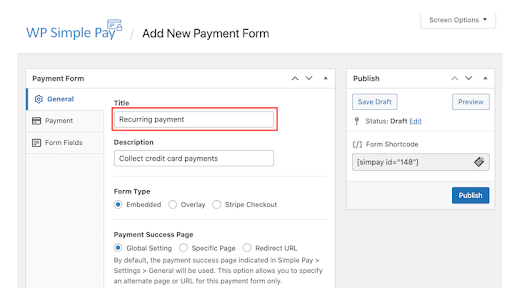
Then enter the project title and form description. Be sure to enter a descriptive title to help you better identify the form for your various needs.
For the next step, you need a WP Simple Pay license.
Under the Payments tab, you will find all the different settings and configurations for multiple payment options for your subscribers. You can add multiple options to offer more flexibility to your customer. Just click on the Add Price options to set your payment options.
Remember, you will not get the recurring payment options in the base version of the WP Simple Pay plugin. But with the licensed version, you get the recurring billing option along with multiple other features.
Here is the screenshot that shows you how to set up a new payment form in WP Simple Pay.
For example, you can set conditional billing options or create multiple tiers and plans for your subscribers. You can set the rewards or special access content that you will provide in these plans.
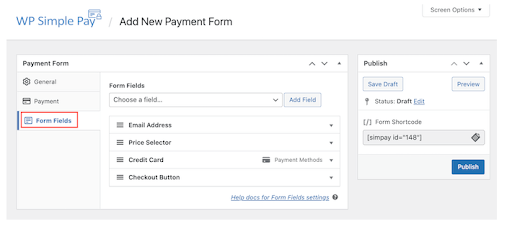
Again, WP Simple Pay offers immense flexibility to WordPress page owners to customize payment forms. You can add extra fields and collect more details from your customers. In addition, you can add other payment options like Google Pay and Apple Pay. You can even remove certain fields to maintain a sleek look for your forms. As you add more fields, you will also get extra dialogue boxes to control their behaviour.
After your form is ready, test out all the fields to ensure they are working as they are supposed.
Once you are satisfied with their function, click on the Publish button. Now, WP Simple Pay will provide you with a simple HTML shortcode to embed in whichever WordPress page you want.
There are countless other settings that you can control from your WP Admin account. Go to settings on the WP Simple Pay UI, and select the field you want to configure.
For example, you can add extra fields that collect your patrons’ email addresses to send them confirmation emails. You can also display a payment confirmation page and include an online link to download the receipts.
WP Simple Pay allows you to provide discount subscription coupons to your patrons. The steps to enable discount coupons are pretty simple.
Open the WP plugin and select the coupons tab. Click on add new to create new coupon codes for your subscribers. You can take it a step further by entering the conditions under which the subscribers can redeem the coupon codes. Moreover, you can even limit the number of times customers can redeem a coupon code. This feature makes WP Simple Pay stand out from the other methods.
Method 4. Accept Recurring Payment Using WooCommerce
In the steps mentioned below, you will understand how to download and use WooCommerce to accept recurring payments from your customers.
-
Plugin Installation to Collect Payments for Multiple Subscriptions
-
Use the Set-up Wizard
-
Set up a Payment Processor to Bring Recurring Revenue
-
Tweak Your Shipping Options
-
Extra Add-ons for Your Page
-
Complete the Setup Process
WooCommerce comes with the easiest download procedure. You get the option to download this from the WordPress repository. You can even download the plugin from the WordPress dashboard itself.
Go to your WordPress site and select the Plugins tab. Click on Add new and search the navigation bar to find the WooCommerce plugin. Click on the Install button once you find the plugin. After the installation process is over, click on the activate button to enable the plugin.
You can manually set up your payment gateway using WooCommerce. But we recommend going through the setup wizard to make the process as seamless as possible.
Here is the screenshot that describes how to manually step the WooCommerce form to connect the payment gateway.
The setup wizard will ask you various questions about your online store and familiarize you with some important settings. Enter all the details about your store, including the payment currency, the physical address of your store, and the type of products you will be selling.
You can later change all this information within the WooCommerce setting tabs. Hence, you don’t have to overthink the details you’re entering.
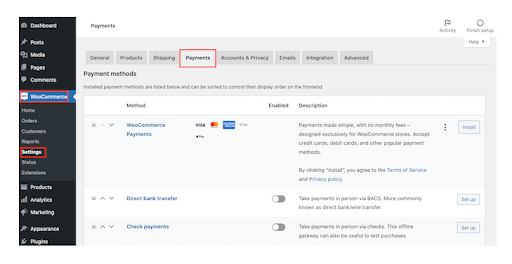
On the following page of the setup wizard, you get to choose the payment for your WordPress store. Enable a Stripe account or PayPal for online payments and cash or check for offline payments.
Here is the screenshot that shows you where to enable the Stripe payment option after selecting the payments option in WooCommerce.
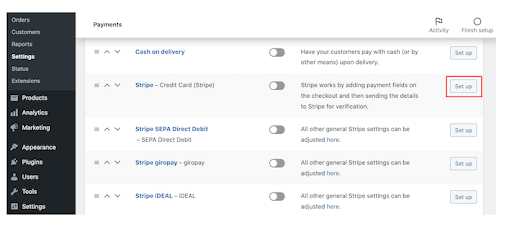
However, you are not limited to these options. You can use third-party extensions to add other payment gateways and processors.
If you’re interested in the WooCommerce Stripe payment gateway, note that Stripe also offers its Radar functionality to prevent credit card fraud and build credibility for your WordPress store.
In the shipping page settings, you can select different shipping rates for the US and other locations. WooCommerce also offers you the option to either select a flat rate for the deliveries or a dynamic rate depending on the distance. If you want to offer free shipping to your customers, you can do it by simply turning both options off. Again, you can change these settings in the future.
On the next page, you will find multiple recommended add-ons for your store. You can even add third-party applications from the stores. Storefront Theme Add-on is a WooCommerce-specific add-on that helps you change the theme of your WordPress webpage. Similarly, the MailChimp add-on enables you to collect your customers’ email addresses and compile them in an easily manageable list. There are plenty more actions you can do with such add-ons.
Finally, you get to the last page of the setup process. Here, also, you will find multiple useful links. You can either go back to your dashboard. Or directly jump into the setting to start configuring them. After you have set up the payment gateways, click on Create a Product to start adding products to your WordPress page.
Till here, you have understood all the methods of creating recurring payments in WordPress. However, you can even stop recurring payments easily.
With the above steps, you know different methods to accept recurring payments in WordPress. You can eliminate a lot of these tasks using the top recurring payment system in the market. These recurring payment providers will take care of the integrations and make things simple for you as a business.
Let’s now discuss which plugin you can use in WordPress backend to set up recurring payments for better knowledge and understanding.
When to Use Which Plugin for Recurring Payments in WordPress?
This quick section will explain when you should use which plugins to accept subscription payments or recurring payments in WordPress sites.
-
Use WPForms Stripe Recurring Payment Option:
- If you exclusively use Stripe for accepting recurring payments
- If you want to accept credit card payments, add Stripe credit card field
-
Use MemberPress:
- If you want to offer different courses
- If you want paywall features on your membership website for paid memberships to block premium content from standard users
- If you’re looking to provide downloadable files for your members
-
Use WP Simple Pay:
- If you want basic recurring payments for your membership site
- If you do not need many eCommerce functionalities
- If you’re a beginner looking for a streamlined UI
-
Use WooCommerce:
- If you need more control over your WordPress store or membership sites
- If you’re looking for added eCommerce functionalities, like a MailChimp mailing list
- If you want to create custom themes for your membership websites with add-ons
- If you wish to use third-party add-ons to access any gateway of your choice
Got more questions about recurring memberships and automatic recurring payments? We’ve got you covered.
Frequently Asked Questions About Recurring Payments in WordPress
-
Is it possible to do monthly payments in WordPress?
Yes, it is feasible to create a recurring payment option for your customers. You can do so with the help of plugins like WPForms, WP Simple Pay, WooCommerce, MemberPress, etc.
-
Which payment options are available on WordPress?
Most plugins offer popular payment gateways to start accepting payments for your subscription products.
For example, Stripe and PayPal integration is present by default for accepting recurring payments. However, you are free to get third-party add-ons to add more online payment methods. You also have offline payment modes such as checks and cash as default.
-
Is it possible to sell subscriptions in WordPress?
Yes, selling monthly recurring subscriptions on WordPress and accepting recurring payments is completely feasible. As long as you are making more than the cost of your plugins, you will be at a profit.
Which is the Best WordPress Recurring Payment Plugin?
The plugins mentioned above all have similar capabilities to accept recurring payments on the WordPress site. However, some minor changes and improvements might encourage you to choose one over the others for monthly recurring payments. For example, WP Simple Pay is for those who want to establish a simple payment gateway using Stripe or PayPal.
On the other hand, WooCommerce offers multiple eCommerce features like Facebook and MailChimp integration. Therefore, the best recurring payment WordPress plugin would be the one that addresses all your needs.